# Chatgpt实战:注册,api调用,国外服务器,web版搭建 (详解篇)
作者:华王
星球:https://t.zsxq.com/0dgMjetVg (opens new window)
学习、分享、成功;提高效率,有所收获!😄
最近有粉丝频繁询问关于gpt如何注册,和api调用相关问题,所以小编从零开始保姆级写一篇详细的教程,供大家参考
参考:
openai聊天界面:https://chat.openai.com/chat
api文档:https://platform.openai.com/
token收费:https://openai.com/pricing
token使用查询:https://platform.openai.com/account/usage
APIKeys: https://platform.openai.com/account/api-keys
api频率限制:https://help.openai.com/en/articles/7039783-chatgpt-api-faqAPIKeys
接码平台:https://sms-activate.org/cn
国外服务器:https://www.ucloud.cn/site/active/uhost.html
gpt开源项目:https://github.com/Chanzhaoyu/chatgpt-web
2
3
4
5
6
7
8
9
也可参考小编去年写的一篇创建自己的AI微信助手, OpenAI ChatGPT接入微信,与AI互动(todo)
# 注册
前提: 科学上网
1申请谷歌账号:
注册地址:https://accounts.google.com/v3/signin/identifier
2使用谷歌账号登录openai
https://chat.openai.com/auth/login
3首次denunciation需要国外手机号验证
解决方案: 推荐sms-activate接码平台:https://sms-activate.org/cn 注意现在需要2美元充值(以前是1美元) 说明:充值后在左侧 OpenAI 菜单中选择一个国家,我选择的是巴西,花费 30 卢布,收到验证码在 20 分钟内使用姐可以了,不行的话取掉换一个国家

# apikey
成功登录后,访问 https://platform.openai.com/overview,在个人 View API keys 中创建一个 SECRET KEY,也就是我们最终想要得到的 API Keys
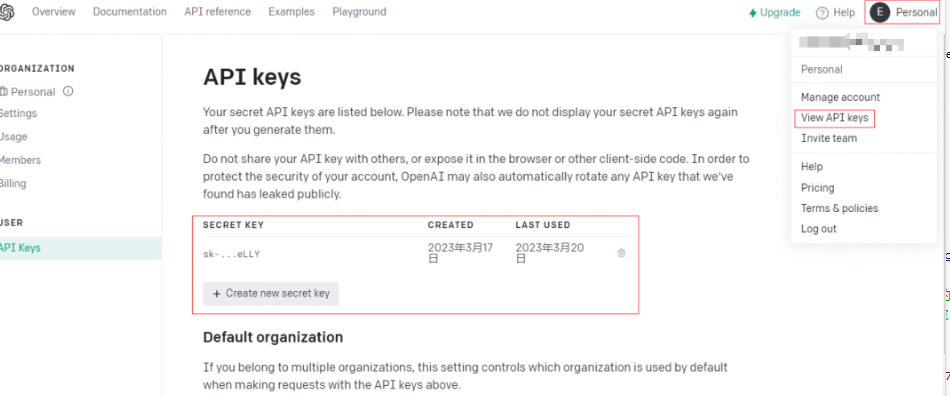
说明申请后提前复制下来,因为之后他就隐藏了
关于收费: 具体点击查看https://openai.com/pricing, FQA(FrequentlyAskedQuestions)也要看,里面有个收费小工具的链接可以帮你评估相关token花费
# 国外服务器
推荐UCloud,打开https://www.ucloud.cn/site/active/uhost.html, 新人注册有便宜的,一年200左右吧,目前小编发现的最便宜的了哦,选择1核2G的,否则后面内存太小跑不起来哈

说明:服务器使用的 CentOs 7.9 的系统,配置下防火墙,放开所有端口
# web版搭建
github找了一个node写的还可以的https://github.com/Chanzhaoyu/chatgpt-web, 9.6k的赞,当然你也可以自己开发
根据他的文档配置自己的服务器
1 安装node16
cd /usr/local
wget https://npmmirror.com/mirrors/node/v16.18.1/node-v16.18.1-linux-x64.tar.xz
tar -xvf node-v16.18.1-linux-x64.tar.xz
mv node-v16.18.1-linux-x64 nodejs
rm -rf node-v16.18.1-linux-x64.tar.xz
ln -s /usr/local/nodejs/bin/node /usr/bin
ln -s /usr/local/nodejs/bin/npm /usr/bin
ln -s /usr/local/nodejs/bin/npx /usr/bin

node -v  //v16.18.1
2
3
4
5
6
7
8
9
10
2 安装 PNPM
npm install pnpm -g
3安装 Docker
yum install -y yum-utils
yum-config-manager \
    --add-repo \
    http://mirrors.aliyun.com/docker-ce/linux/centos/docker-ce.repo
yum makecache fast
yum install docker-ce docker-ce-cli containerd.io

docker version
systemctl start docker #启动Docker
2
3
4
5
6
7
8
9
4 下载项目
yum intall git
git clone https://github.com/Chanzhaoyu/chatgpt-web.git
2
5 填写Openai Api
# service/.env 文件
# OpenAI API Key - https://platform.openai.com/overview
OPENAI_API_KEY=
# change this to an `accessToken` extracted from the ChatGPT site's `https://chat.openai.com/api/auth/session` response
OPENAI_ACCESS_TOKEN=
2
3
4
5
6 安装依赖
pnpm install pnpm bootstrap
7 运行项目 chatgpt-web/目录下
docker build -t chatgpt-web .
# 前台运行
docker run --name chatgpt-web --rm -it -p 127.0.0.1:3002:3002 --env OPENAI_API_KEY=your_api_key chatgpt-web
# 后台运行
docker run --name chatgpt-web -d -p 127.0.0.1:3002:3002 --env OPENAI_API_KEY=your_api_key chatgpt-web
# 运行地址
http://localhost:3002/
2
3
4
5
6
7
左下角的个人信息修改 chatgpt-web/service/src/store/modules/user/helper.ts文件中的defaultSetting()内容
export function defaultSetting(): UserState {
  return {
    userInfo: {
      avatar: 'https://xxx',
      name: '华王code',
      description: '关注公众号 <a href="https://xxx" class="text-blue-500" target="_blank" >echeverra</a>',
    },
  }
}
2
3
4
5
6
7
8
9
有需要的可以具体去这个链接去查看,文档写的还是很全的,也可以自己去二次开发
GPT-4开通 →